
Importing from WinRed
and from other earmarked or conduit sources, such as Anedot
Check this page for general instructions about user-defined imports. While the guidelines below refer to Winred as the conduit, these instructions should work for most earmark imports.
Always back up your database before doing an import. Go to Tools->Backup->Filpac System.
This process can be "rewound" if necessary. Go to Import->Rewind.
Basic routine
Here's a checklist for importing earmarked or "conduit" donations:
1. Enter the total amount of the earmarked donation as a single contribution entry from the organization, i.e. WinRed, that is bundling the contributions. The type should be entered as EA.
2. Go to Import->WinRed Import. Enter the receipt code. Select the import file and then click Check import file.
3. On the Earmark tab select the receipt transaction that was entered in Step 1.
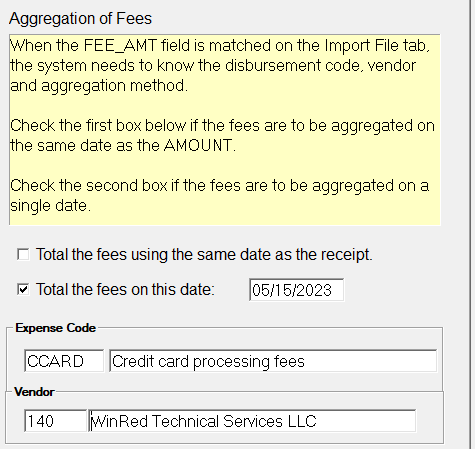
4. On the Expense tab enter the disbursement code for online or credit-card processing, along with the appropriate vendor. Choose how the expenses are to be aggregated. (Hint: it's simplest to total them all in one transaction with the date of the latest contribution to be imported.)
5. On the Parameters tab enter the latest date of the contributions to be imported. The default form should be Online.
6. On the Import File tab, make sure that all crucial fields in the right column have been matched in the left column.
7. Start the import.
Example
In the following example we'll import from a file generated by the online donation site WinRed.
Import File Name: Choose your import file. The default "look-in" folder is C:\FR\Transfer. Copy your import file to that folder and the program will recognize it.
Once your file is selected, click on Check and Prepare Import File. The system will check the file.

Default Codes: Since these are all donations, the Receipt code should be entered. In the example above we've established WINRED as the code for WinRed receipts.
Parameters tab
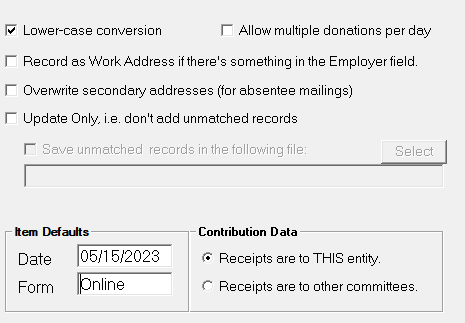
Item Defaults: The Form (i.e. cash, check) should be Online. If a transaction's date is missing, the system will apply the Date entered in this section.
Earmark tab

(Hint: Open the import file in Excel and highlight the Amount column. The total will appear in the bar at the bottom-right of the worksheet.)
The Type of that receipt must be EA to appear on the selection screen above.
Enter the donor committee (example: Winred) and the earmarked donations and dates will appear on the selection screen.
Expense tab
Import File tab
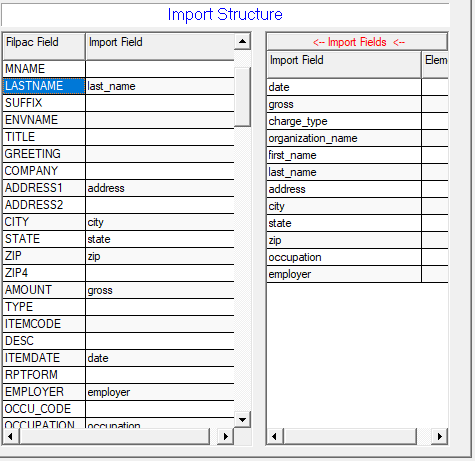
If you're using an import file with fields the program hasn't recognized, send the file to us and we'll "train" the program so you can skip the drag-and-drop routine.
Once your fields are in place, click Start for the import process to begin.
Just a reminder that duplicates are inevitable when you're importing someone else's data entry. So at some point it will be a good idea to check for and merge duplicates. The Filpac system makes it easy.